A hanzi graphics renderer
Posted on July 19, 2022. Tags: processing, java, graphics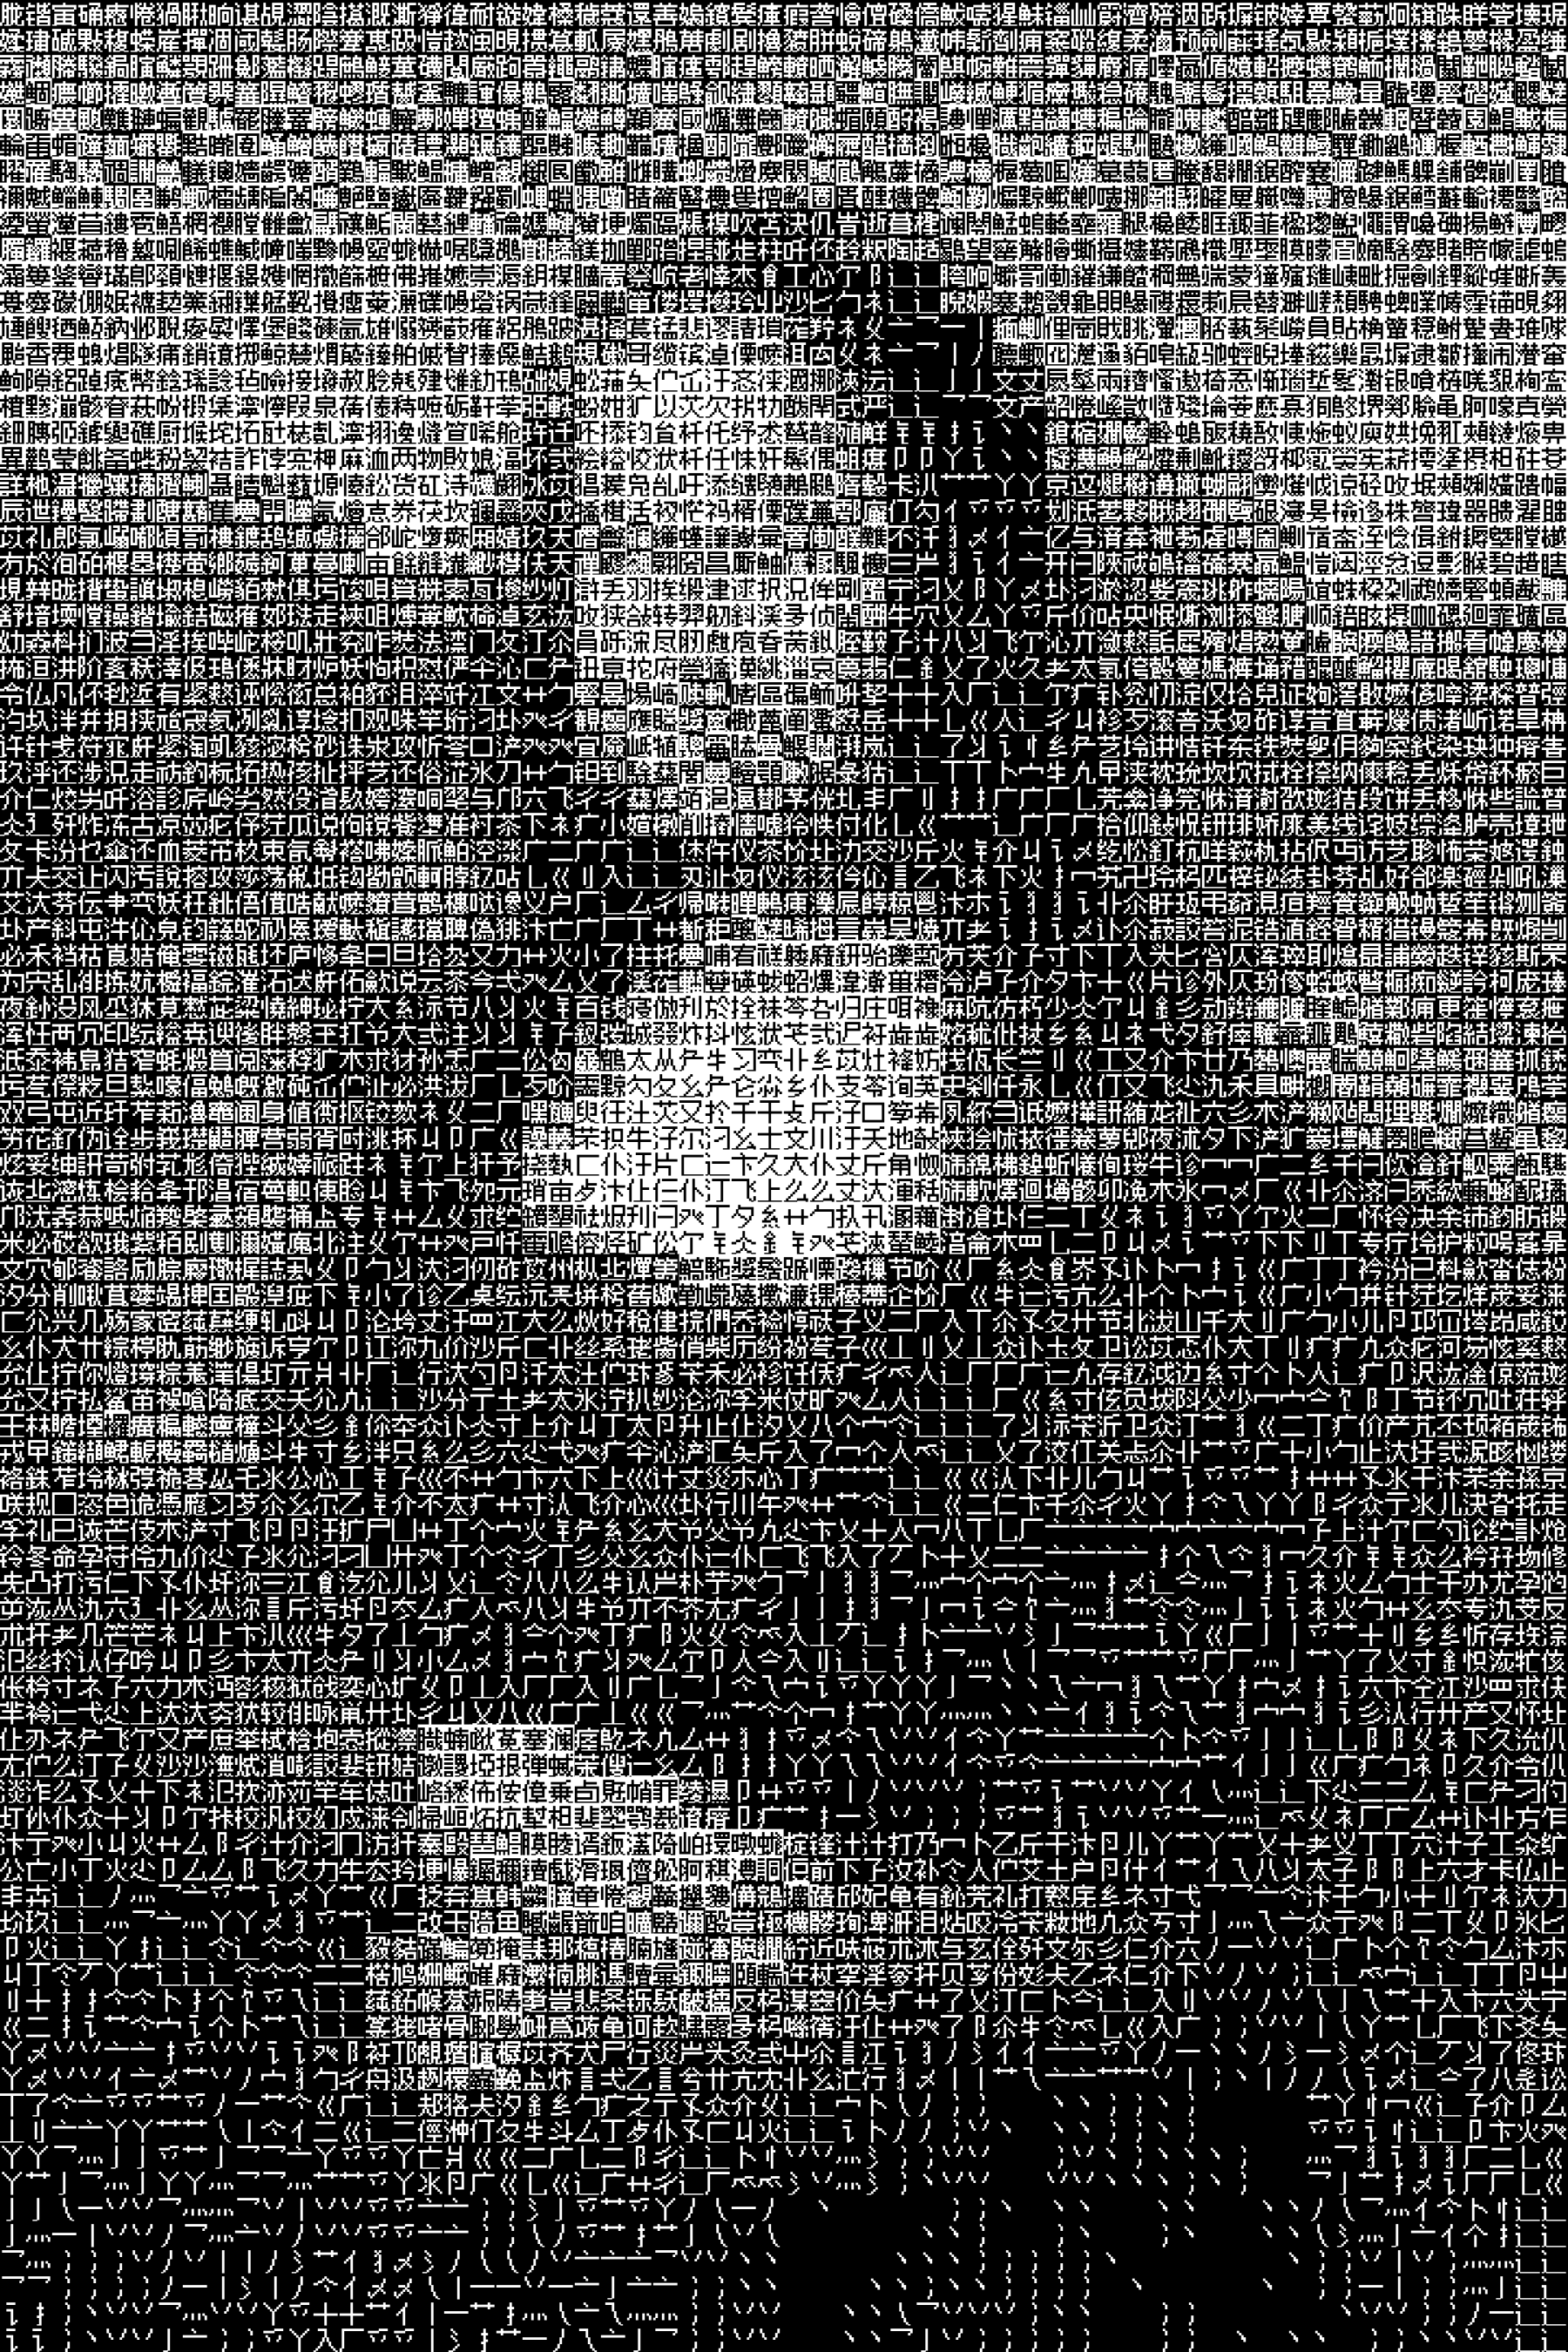 The end goal in action: Mona Lisa as drawn by the hanzi graphics renderer
Dithering, the process by which the number of colors in an image is reduced using scattered spots of color and noise, is commonly used in printers and old display hardware that is only capable of displaying a limited color palette, for example the Atari 2600 or Nintendo’s NES. But these days it’s also used for a stylistic effect, for example to make an image appear stippled.
A common algorithm to approach this problem is Floyd–Steinberg dithering (quite a beautifully obvious algorithm in itself). But what if we used Chinese characters to dither images instead, with characters having higher stroke density being used to draw darker regions, and characters having only a few strokes used to draw lighter regions?
(Yes, I know it wouldn’t technically be dithering then, and more like “stylized pixelating”. But that’s where the idea came from, and the achieved output is quite similar to a dithered image.)
I spent some time looking around online for bitmap Chinese fonts, and eventually settled on Zpix, which manages to support English, Chinese, and Japanese characters within an 11x11 pixel grid.
 Zpix (bottom) compared to a typical sans-serif Chinese font (top).
The basic idea now is to pull out all of the Chinese characters that the font supports, count up how many black pixels each glyph has, sort all the glyphs into “darkness buckets” based on how many black pixels they have, and then map each glyph to a certain shade of gray. Let’s do it!
The first thing I had to do was somehow get a whole set of Chinese characters that Zpix supports. I’m sure there’s an incredibly simple way to iterate through Chinese characters by just looking up the right Unicode range for them, but I couldn’t be bothered with such logic. So I used macOS’s Font Book to output a PDF Specimen of all Zpix characters, copy-pasted the PDF content into a text file, and used a Vim macro to clean it up and put each character on its own line.
This left me with a 20,902-line plaintext file, which makes it easy for me to
open it up and read it line-by-line and get each character separately (without
worrying if the glyph is going to fit into a primitive char, or if
String.charAt is actually going to give me a whole Chinese ideograph).
So now we can finally get into the code!
We’ll start out with the typical Processing shenanigans, setting up a fullscreen canvas, setting the right pixel density for the retina display that I’m on, and clearing out the background.
void setup() {
  pixelDensity(displayDensity());
  fullScreen();
  background(255);
}

void draw() {
  // This function will be called on every frame
}
Every call to draw(), we’ll be drawing whatever we want to display to a small,
low-resolution offscreen canvas object (in Processing, this is known as
PGraphics). We then pass this PGraphics object to our custom glyph renderer,
which will do some magic and draw the dithered version of the image to the
screen.
Since it’s quite expensive to initialize a PGraphics object, we’ll just do
it once, in setup(), and reuse it over and over in draw().
PGraphics pg;

void setup() {
  pixelDensity(displayDensity());
  fullScreen();
  background(255);

  // Create the offscreen canvas. 60px by 40px
  pg = createGraphics(60, 40);
  pg.noSmooth();
}

void draw() {
  pg.beginDraw();
  // drawing to the offscreen canvas...
  pg.endDraw();

  // pass pg to our glyph renderer here
}
Let’s think about what we want our renderer to do.
- It probably needs to do some initialization work, in our case, iterating through our text file of glyphs and sorting characters into buckets based on how dark they are.
- It needs to have some function that receives a PGraphics object, and draws to the window.
- For performance, we only want to draw the pixels that have changed between
this frame and the only frame.
- Another reason we only want to update changed pixels is that since we’ll choose a random glyph of the right darkness, updating it every frame will cause it to rapidly shift between different glyphs of that darkness, and at high frame rates it’ll be indiscernible. We want it to stay still when the darkness in that area doesn’t change.
So roughly, our custom renderer will look something like this:
interface Renderer {
  void draw(PGraphics pg);
}
Where whatever initialization work will be done can just be done in the
constructor, and the draw function receives our PGraphics object and draws
to the actual onscreen window.
Since a lot of the functionality of the renderer is independent of the actual
glyphs (e.g. drawing to the right spot of the screen, drawing the pixels from
the PGraphics object in the correct orientation, properly diffing and updating
changed pixels), let’s quickly make a debug renderer class, which will behave
very similar to our end goal glyph renderer except instead of glyphs, it’ll just
draw colored squares to the screen.
// just for testing purposes, only draws squares
class DbgRenderer implements Renderer {

  // The width and height of the window to draw to
  float w, h;

  // The pixel data of the previous PGraphics frame
  int[] prev;

  public DbgRenderer(float w, float h) {
    this.w = w;
    this.h = h;
    background(255);
  }

  void draw(PGraphics pg) {
    noStroke();

    float squareSize = w / pg.pixelWidth / 2;
    pg.filter(GRAY);
    pg.loadPixels();

    // very slight subpixel perturbation
    // to correct for floating point err
    float xtra = 0.2;

    IntStream.range(0, pg.pixels.length)
      // Only draw the pixels that have changed
      // from the previous frame
      .filter(i -> (prev == null) ? true : pg.pixels[i] != prev[i])
        .forEach(i -> {

          // Calculate the location of the scaled-up pixel
          // and draw it to the window
          fill(pg.pixels[i]);
          float x = (i % pg.pixelWidth) * squareSize;
          float y = (i / pg.pixelWidth) * squareSize;
          rect(
            x - xtra,
            y - xtra,
            squareSize + 2 * xtra,
            squareSize + 2 * xtra);
      }
    );

    // Set the new 'previous frame' to the one we just drew
    prev = pg.pixels.clone();
  }
}
There’s not much going on here; we calculate the size of the rectangle (more
specifically, square) that we are going to use to draw the scaled-up PGraphics
pixel, we calculate the location, and we redraw only the pixels that have
changed in color from the previous frame.
Let’s make sure everything is working so far, by just drawing some Perlin noise
to the PGraphics object and having our debug renderer draw it to the window.
Renderer r;
PGraphics pg;
float time = 0;

void setup() {
  pixelDensity(displayDensity());
  fullScreen();

  r = new DbgRenderer(pixelWidth, pixelHeight);
  pg = createGraphics(60, 40);
  pg.noSmooth();

  background(255);
}

float time = 0;
void draw() {
  pg.beginDraw();
  pg.background(255);
  pg.noStroke();

  for(int i = 0; i < pg.pixelWidth; i++) {
    for(int j = 0; j < pg.pixelHeight; j++) {
      float x = noise(i / 15.0, j / 15.0, time);

      // Just to boost contrast a little, passing
      // it through a smoothstep function once.
      // This below line is totally optional.
      x = x*x*x*(x*(x*6-15)+10);

      pg.fill(x * 255);
      pg.rect(i, j, 1, 1);
    }
  }

  pg.endDraw();
  time+= 0.05;

  r.draw(pg);
}
And the result:
 Ignore the dithering – converting it into a gif isn’t great.
Looks good! Pixelated Perlin noise, drawn to a PGraphics object and blown up
to full screen by our DbgRenderer.
Now, let’s start building what the actual topic of this blog post is: the glyph renderer.
We load in that plaintext file of glyphs that I put together earlier, and
for each character, we’ll draw it to a tiny 12x12 PGraphics object, iterate
through all the pixels in the PGraphics object, and count up the number of
black pixels.
// In the GlyphRenderer constructor

String[] glyphs = loadStrings("/.../zpix-glyphs.txt");
PFont zpix = createFont("Zpix", 6);
int[] blackPxCount = new int[glyphs.length];

// Iterate through all glyphs in the file
for (int i = 0; i < glyphs.length; i++) {

  // draw it to tiny canvas
  PGraphics pg = createGraphics(6, 6);
  pg.noSmooth();
  pg.noStroke();
  pg.beginDraw();
  pg.textFont(zpix);
  pg.textAlign(LEFT, TOP);
  pg.fill(0);
  pg.background(255);
  pg.text(glyphs[i], 0, 0);
  pg.endDraw();

  // Count up number of black pixels in the image
  pg.loadPixels();
  int z = 0;
  for (int j = 0; j < 144; j++) {
    if (red(pg.pixels[j]) == 0) z++;
  }
  blackPxCount[i] = z;
}
So now, we have an array of glyphs, where each element is just one CJK
character, and we have an array blackPxCount of the same length, where each
element at each index is the number of black pixels in the corresponding glyph.
What we want to do now is put together a lookup table mapping from all of the different possible colors a pixel can take on (since we are working in grayscale, that’s just the integers 0 to 255) to the corresponding characters of that desired darkness. In this way, when we’re actually running, we can quickly go into our lookup table and grab out the right glyph for the color we’re looking for.
Here’s where it gets a little tricky. A 12x12 grid has 144 pixels in it. The darkest glyph, when rendered to this 12x12 grid, has 85 black pixels. That means we’re missing almost half of our brightness range, if our darkest black is only 85/144 = 59% black.
Also, as you probably guessed, we’re missing some numbers. For example, there’s no glyphs that have exactly 7 black pixels, and no glyphs that have 9 black pixels. So that’s more chunks of our brightness range gone.
One thing we can do to combat this is to also allow for “inverted” glyphs – that is, instead of drawing black glyphs onto a white background, we instead draw white glyphs onto a black background. This will enable us to go very dark by simply drawing the glyph with the fewest black pixels in inverted colors.
Since we also need to store whether or not to invert a glyph alongside the
glyph itself, let’s just create a small Glyph class to group this data
together.
class Glyph {

  String g;
  boolean invert;
  int idx;

  public Glyph(String g, boolean invert) {
    this.g = g;
    this.invert = invert;
  }

  // Don't worry about this function yet - it's usage will
  // become apparent later!
  Glyph copyWithIdx(int i) {
    Glyph gl = new Glyph(this.g, this.invert);
    gl.idx = i;
    return gl;
  }
}
First we initialize an empty lookup table, lut, with 145 slots (all the
integers 0-144 inclusive). We map each integer to an empty ArrayList<Glyph>
for now.
lut = new ArrayList<ArrayList<Glyph>>(145);
for (int i = 0; i < 145; i++) {
  lut.add(new ArrayList<Glyph>());
}
Now we populate those empty lists with the glyphs. Each character gets added to the lookup table twice, once normal and once inverted:
for (int i = 0; i < blackPxCount.length; i++) {
  lut.get(blackPxCount[i]).add(new Glyph(glyphs[i], true));
  lut.get(144 - blackPxCount[i]).add(new Glyph(glyphs[i], false));
}

// For fully white or fully black, we can just render no glyph
// at all, just the fully white or fully black background
lut.get(0).add(new Glyph("", true));
lut.get(144).add(new Glyph("", false));
Now, we need to deal with those gaps. We’ll keep track of those indices that don’t have any associated glyphs (in other words, their associated list in the lookup table is empty), so we can avoid them later.
unseen = new HashSet<Integer>();
for (int i = 0; i < lut.size(); i++) {
  if (lut.get(i).size() == 0) unseen.add(i);
}
This wraps up our initialization process. Below is the full listing of the
GlyphRenderer code so far.
class GlyphRenderer implements Renderer {

  ArrayList<ArrayList<Glyph>> lut;
  HashSet<Integer> unseen;

  float w, h;
  int[] prev;

  public GlyphRenderer(float w, float h) {
    this.w = w;
    this.h = h;
    background(255);

    String[] glyphs = loadStrings("/.../zpix-glyphs.txt");
    PFont zpix = createFont("Zpix", 6);
    int[] blackPxCount = new int[glyphs.length];

    for (int i = 0; i < glyphs.length; i++) {
      PGraphics pg = createGraphics(6, 6);
      pg.noSmooth();
      pg.noStroke();
      pg.beginDraw();
      pg.textFont(zpix);
      pg.textAlign(LEFT, TOP);
      pg.fill(0);
      pg.background(255);
      pg.text(glyphs[i], 0, 0);
      pg.endDraw();
      pg.loadPixels();
      int z = 0;
      for (int j = 0; j < 144; j++) {
        if (red(pg.pixels[j]) == 0) z++;
      }
      blackPxCount[i] = z;
    }

    lut = new ArrayList<ArrayList<Glyph>>(145);
    for (int i = 0; i < 145; i++) {
      lut.add(new ArrayList<Glyph>());
    }

    for (int i = 0; i < blackPxCount.length; i++) {
      lut.get(blackPxCount[i]).add(new Glyph(glyphs[i], true));
      lut.get(144 - blackPxCount[i]).add(new Glyph(glyphs[i], false));
    }

    lut.get(0).add(new Glyph("", true));
    lut.get(144).add(new Glyph("", false));

    unseen = new HashSet<Integer>();
    for (int i = 0; i < lut.size(); i++) {
      if (lut.get(i).size() == 0) unseen.add(i);
    }
  }

  void draw(PGraphics pg) {
    // TODO
  }
}
Our draw() function will share a lot of similar code with the DbgRenderer’s
draw() function; all of the positioning logic, filtering out pixels that
haven’t changed, etc. remain the same.
void draw(PGraphics pg) {
  noStroke();

  float squareSize = w / pg.pixelWidth / 2;
  pg.filter(GRAY);
  pg.loadPixels();

  float xtra = 0.2;

  PFont zpix = createFont("Zpix", floor(squareSize), false);
  textFont(zpix);
  textAlign(LEFT, TOP);

  IntStream.range(0, pg.pixels.length)
    .filter(i -> (prev == null) ? true : pg.pixels[i] != prev[i])
    // CHANGE HERE
}
What’ll change is what we do with those changed pixels. Instead of just drawing them as colored rectangles, we need to map their color to a glyph, and draw that glyph.
Let’s focus on that mapping first, and think about the drawing later. Pixels can
take on any value between 0-255, so we need to rescale that to 0-144 so we can
use our lookup table. But rescaling is unlikely to give us a nice, clean
integer; rather, we’ll get back a floating point number, from which we can
take floor() and ceil() to get the closest indices below and above our value
respectively.
float normed = red(pg.pixels[i]) / 255.0 * 144.0;
int upper = ceil(normed);
int lower = floor(normed);
We have to tweak the lower and upper bound a bit, because there’s cases where
there may not be an associated glyph with that number of black pixels. Here’s
where we put the unseen list to use! We’ll push out the upper and lower bounds
until we reach a darkness that for sure has an associated glyph for us to use.
while (unseen.contains(upper)) upper++;
while (unseen.contains(lower)) lower--;
And how do we choose which of lower or upper to use as our index? Well,
if the actual brightness of the pixel is really close to the lower bound, we
want it to be much more likely that we use the lower bound, and vice-versa.
So, we’ll choose using a weighted random. This’ll help smooth out some of the
brightness gaps where we don’t have the exact right glyph for the desired
darkness, by mixing appropriate amounts of slightly lighter and slightly darker
glyphs instead.
Then, all we have to do is grab out a random glyph at that index, and return
a copy of that glyph, preserving info about which pixel index this glyph is
associated with (that’s what copyWithIdx is for) so when we draw it next we
know where to put the glyph on the screen.
int idx = (random(lower, upper) <= normed) ? lower : upper;
int len = lut.get(idx).size();
return lut.get(idx).get(floor(random(len))).copyWithIdx(i);
Now, we’ve filtered out only the pixels that changed, and mapped those changed
pixels to associated Glyphs. All that’s left to do is to actually draw them,
which is fairly straightforward; using the same positioning logic as the
DbgRenderer, draw white text on a black rectangle if the Glyph is inverted,
otherwise draw a white rectangle and then black text:
float x = (toDraw.idx % pg.pixelWidth) * squareSize;
float y = (toDraw.idx / pg.pixelWidth) * squareSize;
if(toDraw.invert) {
  fill(0);
  rect(x - xtra, y - xtra, squareSize + 2*xtra, squareSize + 2*xtra);
  fill(255);
} else {
  fill(255);
  rect(x - xtra, y - xtra, squareSize + 2*xtra, squareSize + 2*xtra);
  fill(0);
}
text(toDraw.g, x, y);
And we’re done! Here’s the full listing of the draw() function.
void draw(PGraphics pg) {
  noStroke();


  float xtra = 0.2;
  float squareSize = w / pg.pixelWidth / 2;

  PFont zpix = createFont("Zpix", floor(squareSize), false);
  textFont(zpix);
  textAlign(LEFT, TOP);

  pg.filter(GRAY);
  pg.loadPixels();

  IntStream.range(0, pg.pixels.length)
    .filter(i -> (prev == null) ? true : pg.pixels[i] != prev[i])
    .boxed()
    .map(i -> {
      float normed = red(pg.pixels[i]) / 255.0 * 144.0;
      int upper = ceil(normed);
      int lower = floor(normed);
      while (unseen.contains(upper)) upper++;
      while (unseen.contains(lower)) lower--;
      int idx = (random(lower, upper) <= normed) ? lower : upper;
      int len = lut.get(idx).size();
      return lut.get(idx).get(floor(random(len))).copyWithIdx(i);
    }).forEach(toDraw -> {
      float x = (toDraw.idx % pg.pixelWidth) * squareSize;
      float y = (toDraw.idx / pg.pixelWidth) * squareSize;
      if(toDraw.invert) {
        fill(0);
        rect(x - xtra, y - xtra, squareSize + 2*xtra, squareSize + 2*xtra);
        fill(255);
      } else {
        fill(255);
        rect(x - xtra, y - xtra, squareSize + 2*xtra, squareSize + 2*xtra);
        fill(0);
      }
      text(toDraw.g, x, y);
    });
  prev = pg.pixels.clone();
}
And here’s our hanzi graphics renderer at work, drawing some Perlin noise:

Slowed down, so it’s a bit easier to see the individual glyphs that go into building up the smooth gradients between different darknesses:

That’s all.